
How to Detail a Car Like a Pro for Lasting Results
- optyxautostudio
- Feb 20
- 10 min read

You want your vehicle to stand out on Spokane streets and command attention with every shine. For car enthusiasts and luxury owners, preserving that flawless finish means more than just a quick wash—it requires precise methods and premium products. With steps designed to protect paint, deep clean interiors, and apply advanced coatings for lasting protection, these detailing tips help you maintain your investment and enjoy a stunning, refreshed ride every time.
Table of Contents
Quick Summary
Key Takeaway | Explanation |
1. Thoroughly prepare your vehicle | Rinse and wash using a two-bucket method to create a clean foundation for effective detailing. |
2. Deep clean the interior | Remove all items, vacuum carefully, and use appropriate cleaners to protect materials and enhance resale value. |
3. Restore and protect paint meticulously | Correct imperfections with a paint correction compound and apply ceramic coatings for long-lasting protection. |
4. Apply advanced coatings strategically | Choose coatings based on your vehicle’s needs and weather conditions for optimal durability and appearance. |
5. Inspect thoroughly for perfection | Conduct a detailed inspection under natural light to catch imperfections before finishing the detailing process. |
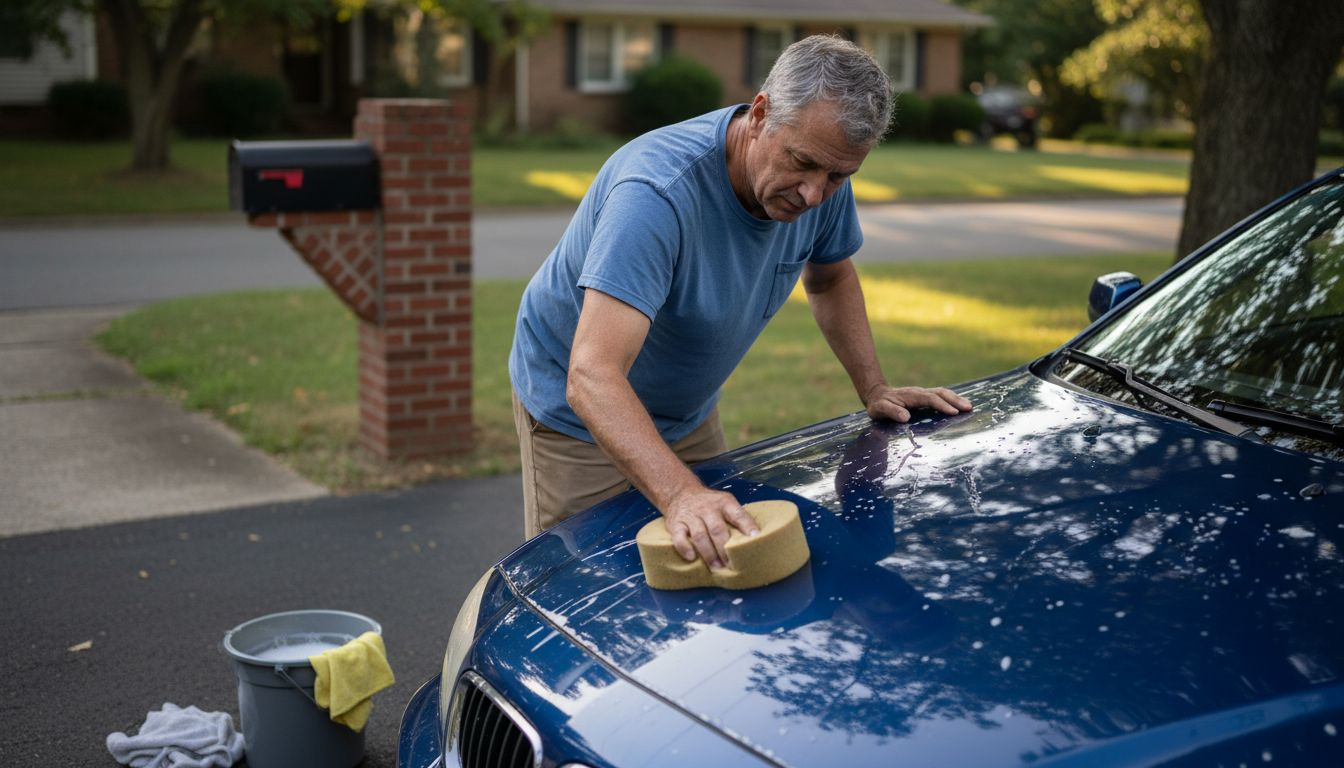
Step 1: Prepare the vehicle with premium cleaning
Proper preparation separates amateur car washing from professional detailing. You’re not just rinsing off dirt—you’re creating a clean foundation that lets you see what your paint actually needs and ensures every subsequent treatment works at peak effectiveness.
Start by rinsing your vehicle thoroughly with water to remove loose debris and dust. This critical first step prevents dragging abrasive particles across your paint when you wash. Use a pressure washer on a low setting if you have one, but keep it at least 12 inches away from the paint surface to avoid damage.
Next, use a two-bucket wash method to protect your paint. Fill one bucket with soapy water and another with clean rinse water. This technique prevents contaminated water from redepositing grit onto your car. Choose dedicated car-wash products specifically formulated for automobiles—household detergents are too harsh and strip protective coatings.
Wash your vehicle from top to bottom:
Start at the roof and work downward
Use a soft sponge or wash mitt to prevent swirl marks
Rinse your mitt frequently in the clean water bucket
Pay special attention to the wheels and wheel wells with a separate brush
The wheel wells and tires require dedicated wheel cleaners because brake dust and road grime accumulate heavily there. Use a stiff brush on these areas, but be gentle on the painted surfaces around the wheels. Avoid tire dressings marketed as protective products—tire manufacturers confirm these aren’t necessary.
Auto detailing goes beyond regular washing by addressing deep cleaning needs that prepare your paint for protection. Once you’ve scrubbed the entire vehicle, rinse thoroughly with clean water until no soap remains, then dry with a soft microfiber towel to prevent water spots.
Check your paint carefully at this stage. Look for swirl marks, oxidation, or other damage. This is your baseline assessment before moving to paint correction and protection steps.
Clean paint is the foundation for everything that follows—skipping this step wastes time and money on higher-level treatments that won’t adhere properly.
Pro tip: Wash your car during cooler parts of the day (early morning or late afternoon) to prevent soap and water from drying too quickly on the paint, which leaves spots and reduces cleaning effectiveness.
Step 2: Deep clean and treat interior surfaces
Your car’s interior deserves the same attention as the exterior. A thorough interior detailing removes dirt, dust, and allergens while protecting your materials from premature wear and deterioration.
Start by removing all items from your vehicle, including floor mats, seat cushions, and personal belongings. This gives you complete access to every surface and prevents damage to your belongings during cleaning.
Begin with vacuuming using appropriate attachments for different areas. Use a crevice tool for tight spaces between seats and door panels, and a brush attachment for upholstery and carpet. Pay special attention to areas where dirt accumulates most—under seats, in cup holders, and along the floor seams.
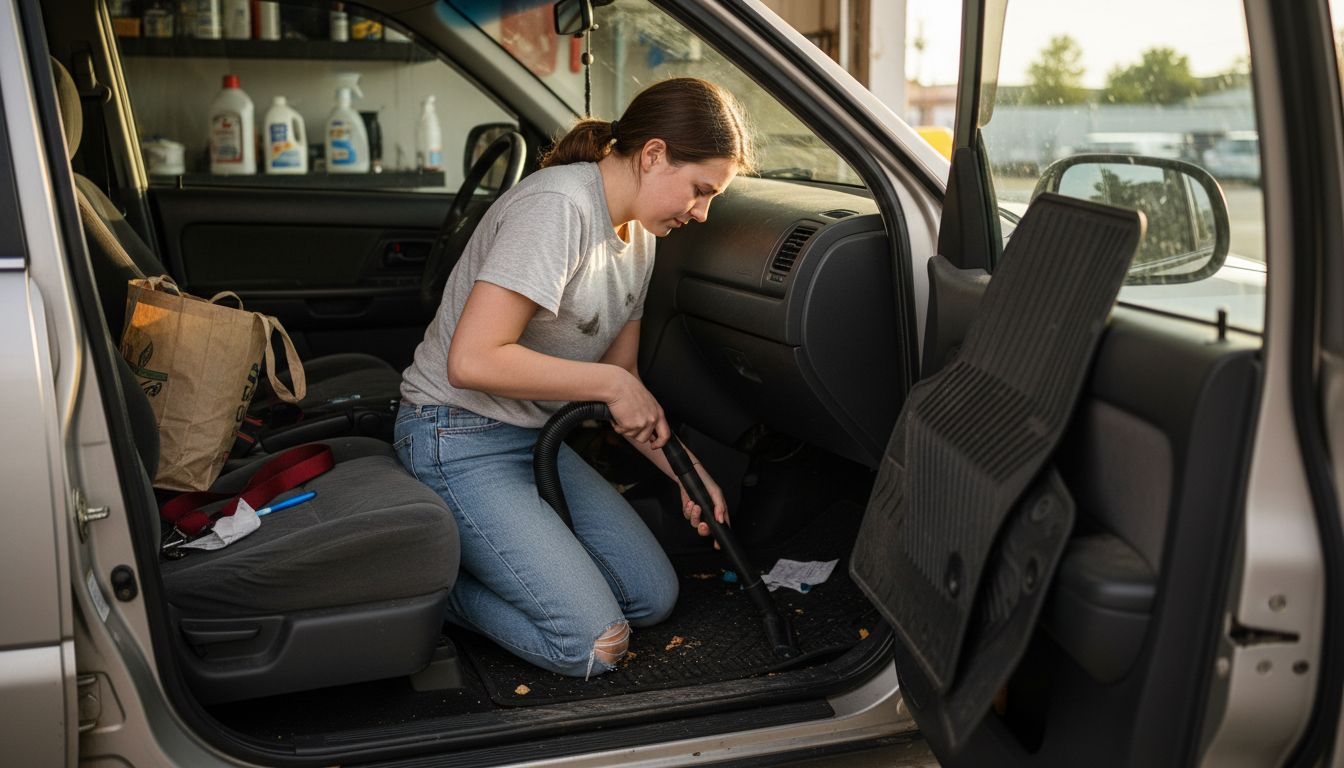
For stubborn dirt on carpets and upholstery, a steam cleaner can be highly effective. Allow any cleaned fabric to dry completely to prevent mold growth. Deep cleaning a car’s interior requires using appropriate cleaners specific to each material type.
Treat different surfaces with targeted methods:
Leather and vinyl surfaces need specialized cleaners or mild soap and water
Follow cleaning with conditioner to prevent leather from drying and cracking
Hard plastic surfaces require automotive-specific cleaners to avoid glare and damage
Allow all items to dry thoroughly before reassembling your interior
Inspect for any moisture issues or mold spots, particularly in areas prone to dampness. Effective mold cleanup requires proper drying and addressing the source of moisture to prevent future growth. Fix any leaks promptly to keep your interior protected long-term.
Once everything is clean and dry, replace your floor mats and reassemble the interior carefully. Your interior will look refreshed and protected from the elements.
Below is a summary of interior surface cleaning methods for common materials:
Surface Type | Recommended Tool | Cleaner Type | Extra Care Tip |
Leather | Soft microfiber cloth | pH-balanced leather cleaner | Follow with conditioner |
Fabric/Upholstery | Brush attachment/vacuum | Fabric/upholstery shampoo | Allow full drying to prevent mold |
Plastic/Trim | Microfiber cloth | Automotive-specific spray | Avoid shiny/glare finishes |
Carpet | Steam cleaner/vacuum | Carpet-safe shampoo | Deep clean under seats |
A properly treated interior maintains your vehicle’s resale value and creates a healthier environment inside your car every time you drive.
Pro tip: Use microfiber cloths instead of paper towels when drying surfaces—they absorb moisture more effectively and prevent lint residue that can trap dust and dirt.
Step 3: Restore and protect paint with precision
This step separates professional detailing from basic car washing. Paint restoration and protection requires attention to detail and the right techniques to achieve results that last for years, not months.
Begin by assessing your paint’s condition carefully. Look for swirl marks, oxidation, water spots, and minor scratches. These imperfections prevent your paint from achieving that deep, glossy finish you’re after and compromise protection. Small scratches and dull spots indicate your clearcoat needs attention.
For light oxidation and minor imperfections, use a paint correction compound applied with a microfiber pad. Work in small sections using circular motions, then buff away the residue with a clean cloth. This removes the damaged outer layer and reveals fresh paint beneath.
Paint correction best practices focus on proper technique to avoid creating new damage while fixing existing problems. The goal is to create a smooth, uniform surface that reflects light evenly.
Once your paint is corrected and clean, apply a protective layer:
Use a ceramic coating for maximum durability and water beading
Apply in thin, even layers following product instructions carefully
Allow proper curing time before exposing your vehicle to moisture
Ceramic coatings bond chemically with your clearcoat for lasting protection
Modern automotive coatings include multi-layer systems with primer, color coat, and clear coat that protect against UV damage, corrosion, and environmental contaminants. Professional-grade products offer superior longevity compared to consumer options.
Alternatively, paint protection film offers physical protection for high-impact areas like the front bumper, hood, and door handles. This transparent film absorbs stone chips and minor scratches without visible damage.
After application, maintain your paint by washing regularly with proper car-wash soap and avoiding harsh chemicals that break down protective coatings.
Here is a comparison of popular exterior paint protection options for your vehicle:
Protection Type | Durability | Key Benefits | Typical Use Cases |
Ceramic Coating | Up to 3 years | Long-lasting shine, water beading, easy cleaning | Whole vehicle surfaces |
Paint Protection Film | 5-10 years | Shields against chips, physical impact, clear appearance | High-impact areas like bumper, hood |
Wax | 1-3 months | Enhances shine, easy re-application | Quick gloss, short-term protection |
Sealant | 6-12 months | Chemical resistance, UV protection | Full exterior, all climates |
A properly protected paint surface maintains its shine, resists fading, and dramatically increases your vehicle’s resale value.
Pro tip: Apply any protective coating during overcast conditions or in a shaded area to prevent premature drying, which causes streaking and uneven coverage.
Step 4: Apply advanced coatings for protection
This is where your vehicle gains years of protection from the elements. Advanced coatings create a durable barrier that shields your paint from UV rays, contaminants, and environmental damage while maintaining that showroom shine.
Before applying any coating, ensure your paint surface is completely clean and dry. Any residual dirt, moisture, or product buildup will prevent the coating from bonding properly and compromise results. Take time to inspect the surface one final time under good lighting.
Choose your coating type based on your priorities and climate in the Spokane area. Ceramic coatings provide exceptional durability, water beading, and ease of cleaning for up to three years. Paint protection film works best on high-impact zones like your front bumper and hood for physical scratch resistance.
For ceramic coating application, follow these steps:
Apply the coating to one small section at a time using a foam applicator pad
Work in thin, even layers following the product’s specific instructions
Allow the recommended flash-off time between layers
Avoid touching treated areas until fully cured
Advanced automotive coatings now include innovations like self-healing surfaces and infrared-reflective pigments that enhance both protection and vehicle functionality. These technologies represent the cutting edge of paint protection available to luxury vehicle owners.
Proper surface preparation and coating selection are critical factors for achieving optimal durability. Professional installation ensures quality and longevity that DIY applications often struggle to match. Consider professional application for maximum results on valuable vehicles.
After application, maintain the coating by washing gently with pH-neutral soap and avoiding abrasive tools. Your coating will perform best with regular, proper maintenance throughout its lifespan.
A professionally applied coating transforms maintenance from a constant battle into simple, straightforward care that takes minutes rather than hours.
Pro tip: Schedule your coating application when temperatures remain between 60-85 degrees Fahrenheit with low humidity—ideal conditions in Spokane’s spring and early fall for perfect curing.
Step 5: Inspect and perfect the final finish
You’re nearly there. This final step separates a good detail job from a professional one by catching imperfections and ensuring your vehicle truly shines under any lighting condition.
Inspect your vehicle in natural daylight, preferably on an overcast day or in shade. Direct sunlight can hide swirl marks and dust, while shade reveals every imperfection. Walk around your entire vehicle slowly, looking at the paint from multiple angles.
Check specifically for these common issues:
Dust or lint trapped in the fresh coating
Swirl marks or holograms from improper buffing
Uneven coating coverage or streaks
Water spots or dried product residue
Missed areas or corners you may have overlooked
Inspecting the final finish involves checking for dust and swirl marks using soft microfiber cloths to gently buff any problem areas. Never use household cleaners or rough materials that could damage your fresh coating and protection.
Professional detailing emphasizes inspecting vehicles in different lighting to identify any imperfections after polishing and coating applications. Pay special attention to hood edges, door jambs, and lower body panels where dirt tends to settle.
If you find minor issues, address them immediately while coatings are still fresh:
Use a clean microfiber cloth to gently buff dust or lint
Apply touch-up protection to any missed spots
Allow proper curing time before driving
Avoid washing for the recommended period
Once satisfied with the finish, document your work with photos. These serve as your baseline for tracking how well your detailing efforts hold up over time. You’ll be amazed at the difference professional detailing makes.
A perfectly detailed vehicle isn’t just about appearance—it’s about protecting an investment that brings you joy every time you drive.
Pro tip: Conduct your final inspection using a detail light or headlamp to illuminate every surface at different angles—this reveals imperfections invisible to the naked eye in normal lighting conditions.
Elevate Your Car Detailing to Expert-Level Excellence
Detailing a car like a pro requires more than just thorough washing and polishing. The article highlights crucial challenges such as achieving lasting paint protection, eliminating swirl marks, and applying advanced coatings with precision to maintain your vehicle’s showroom shine. If you want to avoid common pitfalls like uneven coating coverage or premature wear of protection layers, professional-grade services are essential.
At Optyx Auto Studio, we specialize in delivering exactly what the article recommends for superior, long-lasting results. Our certified installers provide expert paint correction and apply advanced ceramic coatings that protect your vehicle against UV rays, oxidation, and environmental contaminants. Enhance your detailing efforts with tailored solutions such as paint protection film and custom styling for ultimate durability and aesthetics.
Experience the transformation that comes with premium restyling and protection designed to preserve and elevate your vehicle’s finish. Don’t settle for temporary shine or protection that fades. Visit Optyx Auto Studio now and take the first step toward detailing like a true professional—your car deserves nothing less.
Frequently Asked Questions
What steps should I follow to detail a car like a pro?
To detail a car like a pro, start with proper preparation by cleaning the exterior thoroughly, moving to deep cleaning the interior, restoring and protecting the paint, applying advanced coatings, and finally inspecting the finish for perfection. Follow each step systematically for the best results, ensuring every surface is clean and treated.
How can I assess the condition of my car’s paint?
Assess your car’s paint condition by inspecting it closely for swirl marks, oxidation, water spots, and minor scratches. Do this in natural light, as it will help you see imperfections more clearly and determine what specific treatments are needed.
What is the two-bucket wash method, and why is it important?
The two-bucket wash method involves using one bucket for soapy water and another for rinsing your wash mitt. This technique is important because it prevents dirt and grit from being redeposited on your car’s surface, reducing the risk of scratches during washing.
How do I apply ceramic coating for optimal results?
To apply ceramic coating, ensure the paint surface is clean and dry, then work in small sections using a foam applicator pad to spread the coating evenly. Allow it to cure properly according to the product instructions before exposing it to moisture for the most effective protection.
What common mistakes should I avoid when detailing my car?
Avoid using household cleaners, which can damage your vehicle’s surfaces, and refrain from cleaning your car in direct sunlight to prevent streaking and spot formation. Also, don’t rush through the inspection phase, as missing imperfections can compromise your detailing efforts.
How often should I perform professional detailing on my vehicle?
Aim to perform professional detailing on your vehicle every 6 to 12 months, depending on your driving habits and environmental conditions. Regular detailing helps maintain the car’s appearance and protects it from wear and tear.
Recommended


Comments