
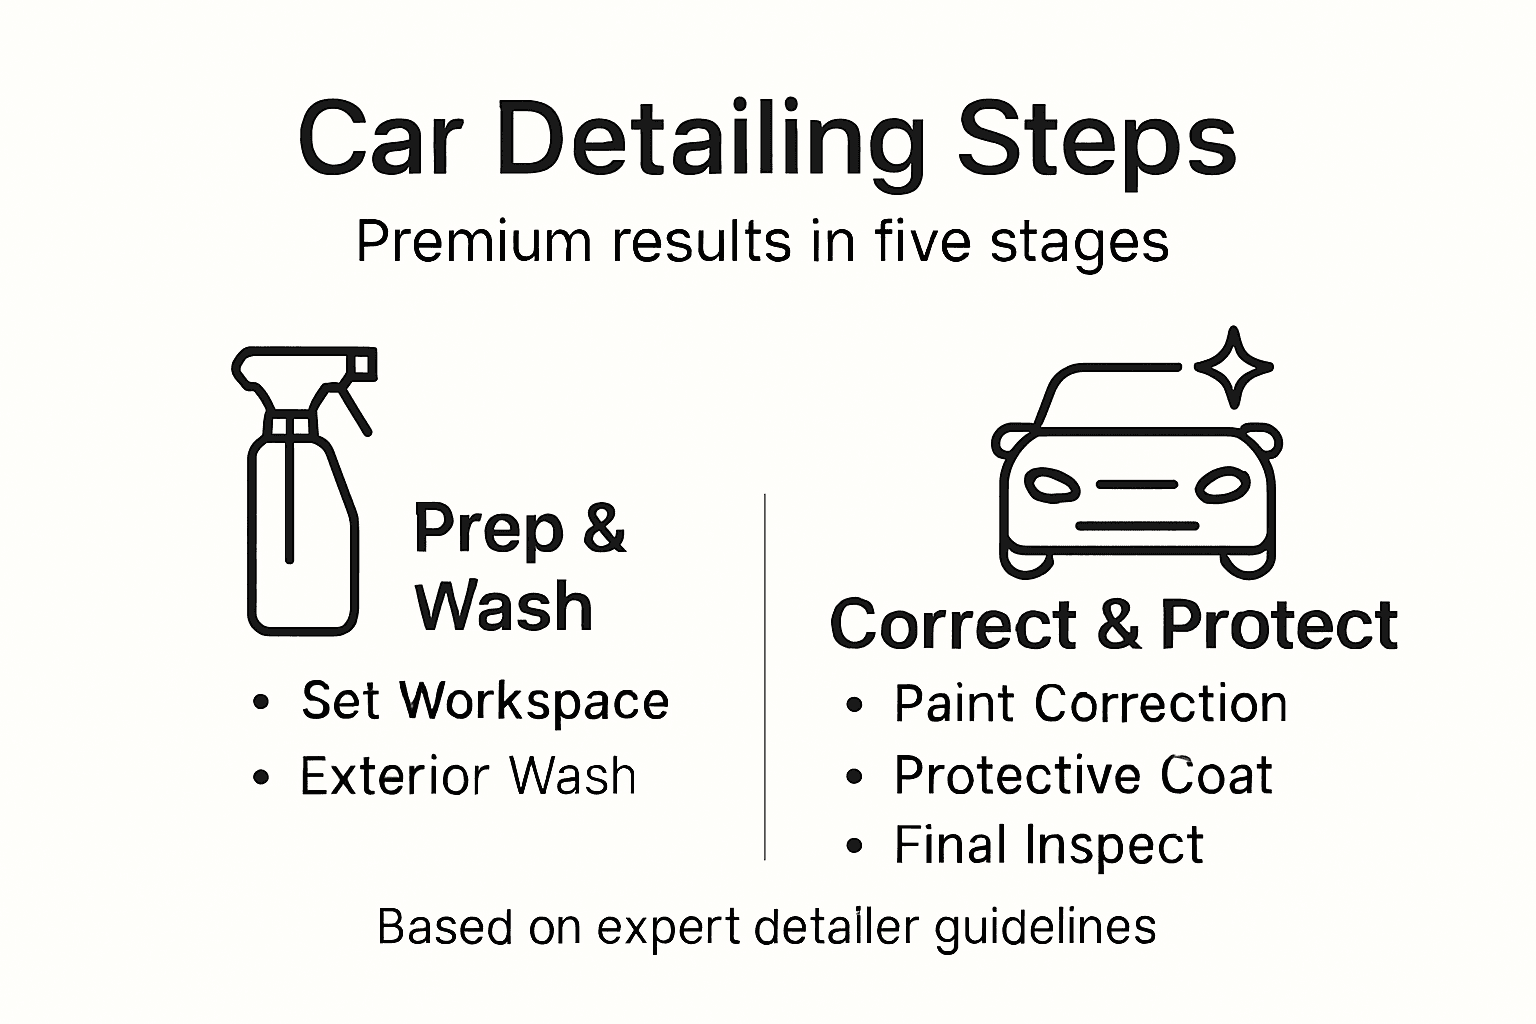
Car Detailing Step by Step for Premium Results
- optyxautostudio
- Jan 21
- 12 min read

Every Spokane luxury vehicle owner knows the frustration of discovering fine scratches or dullness that no quick wash can fix. High-end cars require more than surface cleaning to maintain their stunning appearance and lasting protection. By focusing on a dedicated workspace, smart organization, and professional-grade equipment, you set the stage for truly premium detailing results throughout every step of your car care routine.
Table of Contents
Quick Summary
Key Point | Explanation |
1. Create an Organized Workspace | A clutter-free area with all necessary tools enhances efficiency and ensures quality outcomes during your detailing session. |
2. Conduct Thorough Washing and Decontamination | Effective washing and use of clay bar remove contaminants, ensuring your paint is prepped for correction and protection. |
3. Perform Proper Paint Correction | Address imperfections methodically for a smooth, reflective finish, which is crucial for achieving a premium look. |
4. Apply Appropriate Protective Treatments | Select suitable coatings for long-lasting protection; this prevents damage and reduces future maintenance efforts. |
5. Inspect All Surfaces Post-Detailing | A comprehensive final check ensures quality, catching any missed areas or issues before finishing the job. |
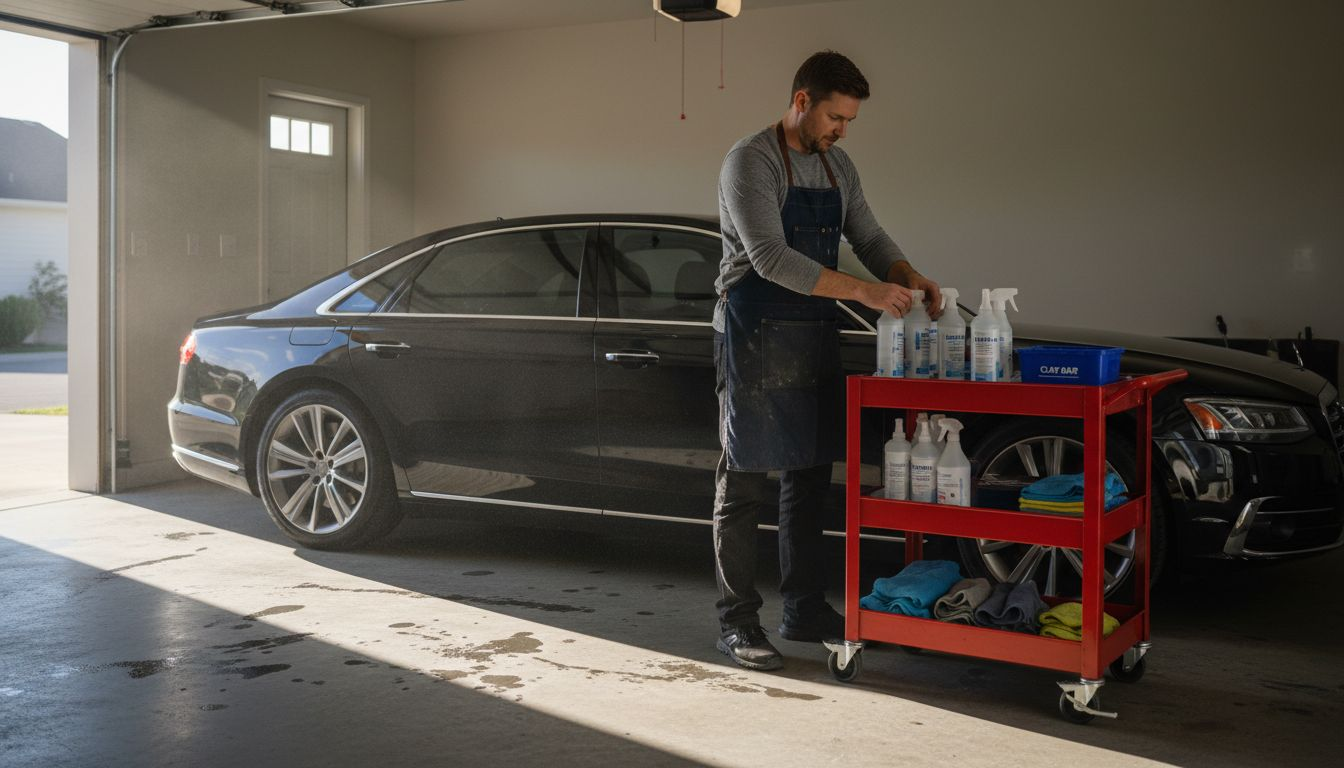
Step 1: Prepare the Workspace and Gather Materials
Before you touch a single panel on your luxury vehicle, you need a dedicated workspace and the right tools at your fingertips. This foundational step determines whether your detailing session runs smoothly or becomes a frustrating scramble for supplies midway through. Think of it as setting the stage before the performance begins. The space you choose and the materials you assemble will directly impact the quality of your results and how efficiently you complete the job.
Start by selecting a location that offers protection from the elements. An enclosed garage, covered carport, or shaded driveway works best, though covered is always preferable. Direct sunlight accelerates product drying and makes it harder to achieve flawless results. Wind also matters more than you might think, as it can blow dust and debris onto freshly treated surfaces. Once you’ve identified your space, clear away unnecessary items and clutter. Grouping materials by job duties significantly improves your workflow, so organize your supplies into logical zones. Position frequently used items within arm’s reach of where you’ll be working. Store liquids and chemicals away from direct sunlight and heat sources to maintain their integrity. Your detailing area should feel spacious enough to move around your vehicle comfortably without constantly repositioning tools and buckets.
Now gather your materials strategically. You’ll need two buckets (one for soapy water, one for rinsing), microfiber wash mitts, quality microfiber drying towels, and appropriate wash media. For deep cleaning and polishing work, professional detailing equipment like orbital dual action buffers and power washers becomes essential when you’re tackling heavier correction work. Stock specialized products including wheel cleaner, glass cleaner, clay bar detailing spray, and polishing compounds suited to your vehicle’s clear coat. If your vehicle has experienced environmental damage or swirl marks, you’ll appreciate having multiple grades of microfiber pads available. Arrange your workspace so that products and tools progress logically through your workflow. Exterior work materials should be grouped separately from interior detailing supplies. Don’t forget personal protective equipment including gloves, eye protection, and adequate ventilation if you’re working with chemical products.
The quality of your workspace directly affects both safety and results. A disorganized setup means wasted time, potential product contamination, and an increased chance of missing spots or applying products unevenly. Your luxury vehicle deserves better than a haphazard approach. Taking thirty minutes to properly prepare saves hours later and protects your investment.
Pro tip: Create a detailing cart or rolling station where you group all your tools and products by application sequence, allowing you to work through each step without searching for supplies and keeping everything organized in one convenient location.
Step 2: Wash and Decontaminate the Exterior Surfaces
This step transforms your vehicle from dusty and contaminated to genuinely clean at a microscopic level. Surface washing removes loose dirt and debris, but decontamination goes deeper, eliminating embedded contaminants that regular washing leaves behind. These contaminants include industrial fallout, brake dust, tree sap, and oxidized paint particles that cling to your clear coat. Getting this right sets up everything that comes next, whether you’re moving toward paint correction or protection.
Start with a thorough rinse using cool water to remove loose dirt and grime. A power washer works exceptionally well here, but keep the pressure moderate to avoid forcing water into seals or crevices. Once you’ve rinsed, fill your wash bucket with quality car wash product and cool water. This is critical: use dedicated car wash products rather than household cleaners, as those will strip protective coatings and dull your paint. Work from the top of your vehicle down to the bottom, using a soft microfiber wash mitt in straight lines rather than circular motions. The two bucket method keeps your mitt clean, minimizing the chance of dragging abrasive particles across your paint. Pay special attention to the wheels and lower panels, which accumulate the heaviest contamination. Rinse thoroughly after washing, then dry with clean microfiber towels to prevent water spots.
Now comes the decontamination phase that separates basic washing from professional detailing. After your initial wash and while the paint is still slightly damp, use a clay bar with a detailing spray to gently glide across the surface. You’ll feel the resistance decrease as the clay removes bonded contaminants that water alone cannot lift. This tactile feedback tells you the paint is getting progressively cleaner. For more stubborn contamination or if you’re addressing paint correction work, professional equipment such as drill brushes and specialized cleaning agents may be necessary to prepare the surface thoroughly. The clay bar method works beautifully for most luxury vehicles and removes contaminants that would otherwise interfere with coatings or polish applications. Rinse the clayed areas one final time and dry completely. Your paint will feel smooth and look noticeably brighter. This decontamination layer is genuinely important because it removes the microscopic particles that prevent products from bonding properly or that create haze and dullness.
Many detailing professionals rush through washing and jump straight to polishing, but that approach wastes time and product. Contaminated paint resists proper treatment and shows poor results. A luxury vehicle deserves the full sequence, which means taking time with this foundational step.
Pro tip: Always work in shade or when the surface is cool to the touch, as warm paint causes wash products and water to dry too quickly, leaving streaks and product residue that requires additional cleanup.
Step 3: Correct Paint Imperfections for a Smooth Finish
Your paint likely harbors more than you realize. Swirl marks from careless washing, fine scratches from road debris, and oxidation create a dull appearance even after thorough cleaning. This step removes those imperfections and restores the clarity and depth your luxury vehicle deserves. Paint correction transforms a tired looking finish into something genuinely impressive.
Begin with a test spot in an inconspicuous area to assess your paint’s condition and determine the appropriate correction strategy. You’ll need polishing techniques using multispeed buffers to effectively address swirl marks and light scratches. Start with a lower speed setting on your orbital buffer and work in overlapping sections, applying consistent downward pressure without forcing the machine. The pad selection matters tremendously here. Use a foam pad paired with a polishing compound for light correction work, then progress to cutting pads with more aggressive compounds if deeper scratches or oxidation demands it. Work methodically across each panel, paying special attention to horizontal surfaces that catch the most light and show imperfections most visibly. Your movements should be smooth and controlled, overlapping each pass by about fifty percent to avoid missing spots. You’ll feel the resistance change as you work, and you’ll see the finish becoming progressively smoother and glossier. This tactile feedback helps you understand whether you’re making progress or need to adjust your technique.
Understanding why paint correction delivers lasting vehicle beauty matters because it shows you’re not just fixing today’s problems but preventing future damage. Once you’ve addressed the major imperfections, move to a lighter compound and pad combination to refine the finish. This second pass eliminates any hazing or swirl marks left by the correction process itself. Buffer work requires patience and practice, so don’t rush. Work in the shade or when the surface is cool, as heat accelerates product drying and makes the process more difficult. After correcting each section, wipe away the compound residue with a clean microfiber towel and examine your work under different lighting angles. Some scratches may require multiple passes or hand techniques using clay bar methods to fully address them. The goal is a finish that looks uniformly smooth and reflective, with deep color and minimal visible defects.
Many first time detailers underestimate the time this step requires. A luxury vehicle with moderate imperfections can take six to eight hours of buffer work to achieve truly premium results. That investment in time translates directly into a transformed appearance that commands attention.
Pro tip: Start with the least aggressive compound and pad combination that addresses your paint condition, then progress to stronger options only if needed, since overaggressive correction removes too much clear coat and creates its own problems down the road.
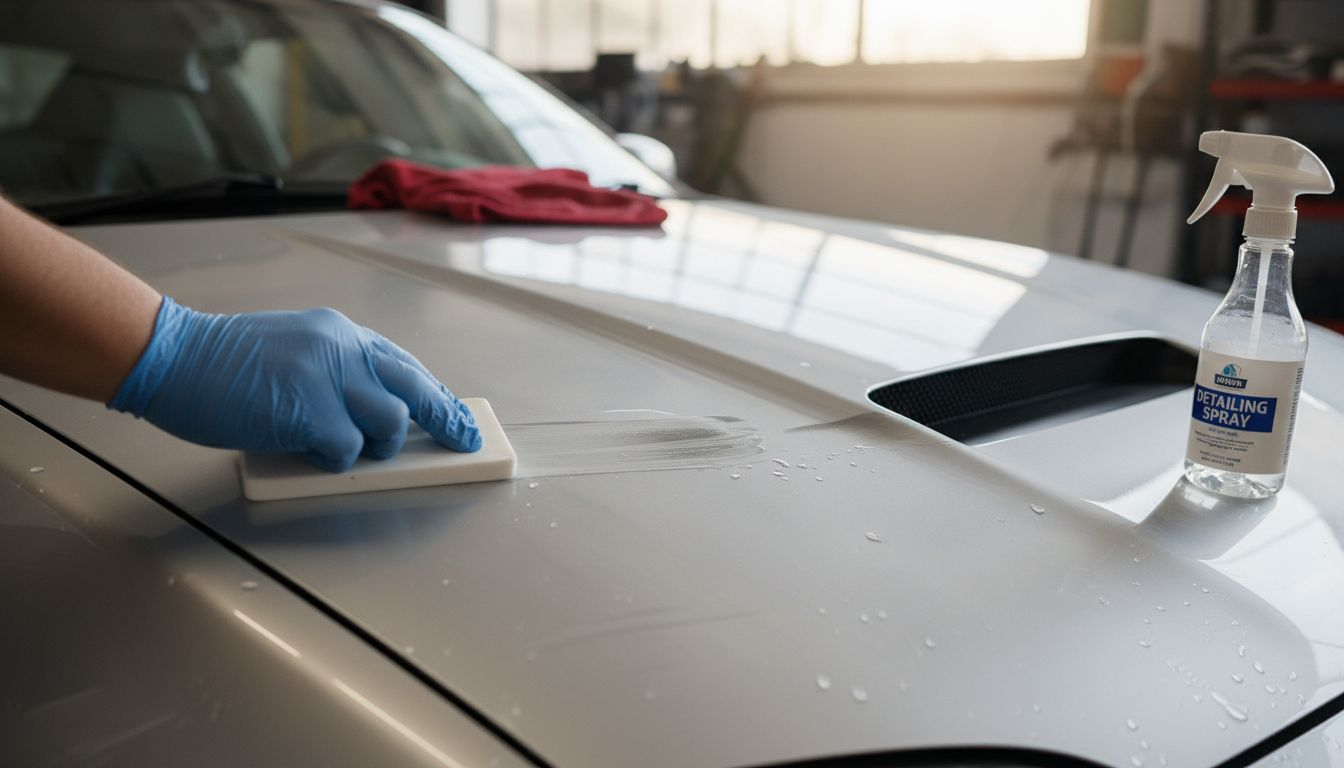
Step 4: Apply Protective Treatments and Coatings
Your beautifully corrected paint needs protection from the elements, and this step is where that defense begins. Protective coatings create a barrier against UV rays, acid rain, industrial fallout, and oxidation. The right treatment dramatically extends the life of your paint’s appearance and makes maintenance exponentially easier going forward. This is where premium results become lasting results.
Start by selecting the right protective product for your situation. Traditional wax offers affordability and a warm aesthetic but requires reapplication every three to six months. Sealants provide longer protection, typically lasting six to twelve months with improved water beading. For luxury vehicles where longevity matters most, applying protective waxes and sealants represents just the beginning. Modern ceramic coatings offer superior protection lasting two to five years, with exceptional hydrophobic properties that shed water and contaminants efficiently. Each option involves different application methods, so understanding your choice matters before you begin. Ensure your paint is completely clean and dry before applying any treatment. Even microscopic dust particles trapped under a coating create permanent blemishes, so a final inspection with a clean microfiber cloth is worthwhile. The surface temperature should be between sixty and eighty five degrees Fahrenheit for optimal application and curing.
For wax or sealant application, use a foam applicator pad in straight lines or small circular motions, applying thin, even layers. Avoid oversaturation, which wastes product and creates uneven coverage. Allow the recommended drying time (typically fifteen to thirty minutes) before buffing with clean microfiber towels in overlapping motions. The buffing stage reveals the shine and removes any haze or residue. Work methodically across each panel, ensuring complete coverage without missing edges or trim. Understanding protective coating fundamentals helps you appreciate why multiple thin applications often work better than one thick application. If applying ceramic coatings, follow the specific manufacturer instructions precisely, as application methods vary significantly between products. Some ceramic coatings require hand application with specific pad types, while others use spray application techniques. The curing time for ceramic coatings extends considerably, often ranging from twenty four to forty eight hours before the vehicle is fully protected. During this curing window, avoid washing, parking in rain, or exposing the vehicle to moisture.
Here’s a comparison of common protective treatments and their characteristics:
Treatment Type | Durability | Water Beading Effect | Maintenance Frequency |
Traditional Wax | 3–6 months | Moderate | Apply every season |
Paint Sealant | 6–12 months | Strong | Apply twice per year |
Ceramic Coating | 2–5 years | Exceptional | Minimal, mainly regular wash |
Many detailers rush this step, but it deserves the same attention you invested in correction. Improper application means reduced protection and diminished aesthetics. Take your time, work in shade, and follow product guidelines precisely. Your investment in premium protection today prevents expensive paint restoration later.
Pro tip: Apply protective coatings in sections rather than the entire vehicle at once, allowing you to maintain a wet edge and ensure even coverage without the coating drying unevenly or developing lap marks between sections.
Step 5: Inspect Results and Finalize Car Detailing
You’ve invested significant time and effort into washing, correcting, and protecting your vehicle. Now comes the moment that separates amateur detailing from professional results: thorough inspection. This final step confirms that every surface meets your standards and that the work is genuinely complete. A comprehensive inspection catches any missed spots, uneven application, or areas requiring touch up before you consider the project finished.
Begin your inspection in natural daylight, ideally outdoors where you can see your vehicle from multiple angles and under various lighting conditions. Natural light reveals imperfections that artificial garage lighting would miss. Walk around the entire vehicle slowly, examining each panel from several distances and angles. Look for swirl marks or haze that might indicate incomplete polishing or improper buffing. Check the clarity of your paint finish by tilting your head and observing how light reflects across the surface. The paint should appear uniformly glossy with deep color saturation and minimal visible defects. Examine the edges of panels, trim pieces, and door jambs where product residue often accumulates or where coverage might be incomplete. Thorough inspection ensures all surfaces are clean and defects corrected, meeting the standards expected from premium detailing work. Run your hand gently across the paint to confirm the surface feels smooth without texture or gritty spots. Any roughness indicates remaining contaminants or incomplete polishing. Check your wheel finish and tire sidewalls for cleanliness and consistent appearance. Inspect glass surfaces for streaks or residue that detract from the overall presentation. Look at chrome, trim, and accent pieces to verify they’re clean and undamaged.
Next, test your protective coating’s performance by observing water beading behavior. Spray a small amount of water onto a clean panel and watch how it behaves. Properly applied coatings create tight water beads that bead off the surface efficiently. Poor beading suggests incomplete coverage or improper application that requires remedial work. Take this step seriously because it indicates whether your protection will actually perform as intended. Examine the interior as well if you detailed it. Verify that surfaces are clean, products applied evenly, and that no residue remains on trim or upholstery. Document your final results with photographs taken under consistent lighting conditions. These images serve as a baseline for future maintenance and provide reference for any warranty considerations.
These inspection focus areas help ensure a flawless result:
Inspection Focus Area | What to Look For | Why It Matters |
Paint Finish | Uniform gloss, no haze | Confirms correction was thorough |
Edges and Trim | No excess residue | Avoids visible buildup |
Water Beading | Tight, consistent beads | Verifies protection is effective |
Glass/Chrome | Streak-free clarity | Enhances vehicle’s overall look |
If you discover areas needing correction, address them immediately while you’re already set up and focused. Small touch ups now prevent larger problems later. The inspection phase typically requires thirty to forty five minutes but pays dividends in ensuring your work meets premium standards. A luxury vehicle deserves nothing less than flawless completion.
Pro tip: Perform your final inspection the day after application when protective coatings have fully cured, as this allows you to assess true water beading, gloss level, and overall finish without interference from wet or partially cured product.
Elevate Your Car Detailing to Luxury-Level Perfection
Achieving premium results in car detailing demands precision, patience, and professional-grade protection—challenges that many vehicle owners face when attempting it alone. From thorough paint correction to durable protective coatings, every step mentioned in “Car Detailing Step by Step for Premium Results” highlights how the right workspace setup, expert technique, and quality materials dramatically impact your vehicle’s finish and longevity. If you want to transform your luxury vehicle with guaranteed flawless clarity, deep gloss, and lasting protection against environmental damage, trusting a seasoned specialist like Optyx Auto Studio is essential.
Discover our tailored solutions including expert paint correction, high-performance ceramic coatings, and precise ceramic window tinting crafted to protect and enhance your car’s appearance for years. With over 35 years of experience, certified installers, and a commitment to meticulous craftsmanship, we help you avoid common pitfalls like uneven application and premature finish wear. Don’t settle for anything less than a showroom-quality finish that preserves your investment now and into the future. Visit Optyx Auto Studio to schedule your consultation and experience automotive detailing that truly matches your vehicle’s premium character.
Frequently Asked Questions
What are the essential materials needed for car detailing?
To start your car detailing, you’ll need two buckets, microfiber wash mitts, quality microfiber drying towels, and wash media. Gather specialized products like wheel cleaner, glass cleaner, clay bar detailing spray, and polishing compounds tailored to your vehicle’s clear coat.
How do I properly wash and decontaminate my vehicle’s exterior?
Begin with a thorough rinse using cool water followed by washing with dedicated car wash products. After washing, use a clay bar with a detailing spray on damp paint to remove embedded contaminants and achieve a smooth surface.
What is the process for correcting paint imperfections?
Start by testing an inconspicuous area of your vehicle and choose the appropriate polishing techniques to address swirl marks and scratches. Work in overlapping sections with an orbital buffer at a lower speed, applying consistent pressure for optimal results.
How do I apply protective treatments to my vehicle’s painted surfaces?
Select a protective product based on your needs, such as wax, sealant, or ceramic coating. Apply it using a foam applicator pad in thin, even layers, and allow the recommended drying time before buffing to achieve a glossy finish.
What should I look for during the final inspection of my car detailing?
During your final inspection, evaluate your vehicle’s paint finish for uniform gloss and absence of haze. Check edges and trim for excess residue, and test water beading on the paint to ensure effective protective treatment.
How long does the entire car detailing process typically take?
The car detailing process may take several hours, with paint correction alone potentially requiring six to eight hours depending on the vehicle’s condition. Allocate enough time to ensure each step is executed thoroughly for the best results.
Recommended


Comments