
7 Paint Correction Best Practices for Lasting Shine
- optyxautostudio
- Jan 17
- 10 min read

Swirl marks, scratches, and dull paint can make your car look years older than it really is. Even with the best intentions, skipping the right steps during paint correction can actually cause more harm than good. The solution lies in understanding each stage of the process, from assessing the paint’s true condition to picking the safest products for your specific finish.
This guide breaks down what you need to know for professional level paint correction results. You’ll discover how careful preparation, proper decontamination, and thoughtful technique combine to revive your vehicle’s shine while protecting its surface. Get ready to learn practical methods that keep your paint looking flawless and protected for the long haul.
Table of Contents
Quick Summary
Takeaway | Explanation |
1. Assess Paint Condition Thoroughly | Conduct a detailed inspection using natural light to identify all imperfections before starting the correction process. |
2. Perform a Comprehensive Decontamination Wash | Use specialized techniques and products to remove contaminants that can hinder effective polishing and cause damage. |
3. Select the Appropriate Compound and Pad | Choose compounds and pads based on paint hardness and damage level to ensure effective correction without damaging the surface. |
4. Work in Small Sections for Accuracy | Divide the vehicle into manageable areas to achieve consistent results while monitoring correction progress and minimizing risks. |
5. Seal the Paint After Correction | Apply a protective layer like ceramic coating immediately after correction to preserve the finish and enhance durability against environmental factors. |
1. Assess Paint Condition Before Starting
Understanding your vehicle’s paint condition is the critical first step in any successful paint correction process. Professional automotive detailers know that a thorough initial assessment prevents potential damage and ensures targeted, effective treatment.
Begin by performing a comprehensive visual and tactile inspection of your vehicle’s paint surface. Natural lighting provides the best environment for detecting imperfections like swirl marks, light scratches, oxidation, and paint contamination. Run your hand gently across the surface (with a clean microfiber glove) to feel for roughness or embedded contaminants that might not be immediately visible.
The key is to evaluate paint surface characteristics systematically. Look for different types of paint damage: clear coat scratches, oxidation patches, water spots, and bird dropping etching. Each type of imperfection requires a specific correction approach.
Utilize specialized tools like a paint thickness gauge to measure the remaining clear coat depth. This prevents aggressive polishing that might compromise the paint’s protective layer. Some vehicles with thin or previously repainted surfaces might require gentler correction techniques to avoid causing additional damage.
Classify your paint’s condition into clear categories: light marring, moderate oxidation, or heavy defect levels. This classification helps determine the appropriate polishing compounds, pad selections, and correction techniques needed to restore your vehicle’s finish.
Pro tip: Always perform your paint condition assessment under bright, natural daylight to reveal subtle imperfections that artificial lighting might conceal.
2. Always Use a Decontamination Wash
A proper decontamination wash is the foundation of any successful paint correction process. This critical first step removes stubborn contaminants that can interfere with polishing and potentially cause additional damage to your vehicle’s paintwork.
A comprehensive decontamination involves more than just standard car washing. You need to systematically remove surface contaminants before treatment using specialized techniques that go beyond typical soap and water cleaning.
Chemical Decontamination Steps:
Use an iron removal solution to dissolve metallic particles
Apply a clay bar treatment to extract embedded surface contaminants
Utilize a dedicated automotive surface cleaner that strips away old wax and residues
Physical Decontamination Process:
Start with a two bucket washing method
Use microfiber wash mitts to minimize potential scratching
Rinse thoroughly between each cleaning stage
Ensure complete removal of cleaning chemicals
Professional detailers understand that dirt clay iron particles road grime and industrial fallout create microscopic barriers preventing polishing compounds from working effectively. By removing these contaminants you create an optimal surface for paint correction techniques.
Pro tip: Always work in a shaded area and use dedicated microfiber towels for each decontamination stage to prevent cross contamination of cleaning products.
3. Choose the Right Compound and Pad
Selecting the perfect compound and pad combination is a nuanced art that can make or break your paint correction process. Understanding how different abrasives interact with your vehicle’s paint surface is crucial for achieving a flawless finish.
Compound Selection Criteria:
Evaluate paint hardness
Assess depth of surface imperfections
Match compound cutting power to specific defect levels
Pad Types and Their Applications:
Cutting Pads: Aggressive correction for severe defects
Polishing Pads: Medium correction for moderate imperfections
Finishing Pads: Final refinement for maximum gloss
Professional detailers understand that paint surface interactions require precision. Each paint type and defect level demands a unique approach. Soft paint requires gentler compounds while harder clear coats can withstand more aggressive treatments.
Begin with the least aggressive combination possible. Start with a less cutting compound and softer pad. Gradually increase aggressiveness only if initial attempts do not produce desired results. This methodical approach prevents unnecessary paint removal and potential damage.
Matching Strategy:
Soft foam pads for light correction
Microfiber pads for moderate defect removal
Wool pads for heavy correction on harder paint surfaces
Pro tip: Always test your compound and pad combination on a small inconspicuous area first to ensure compatibility and desired correction results.
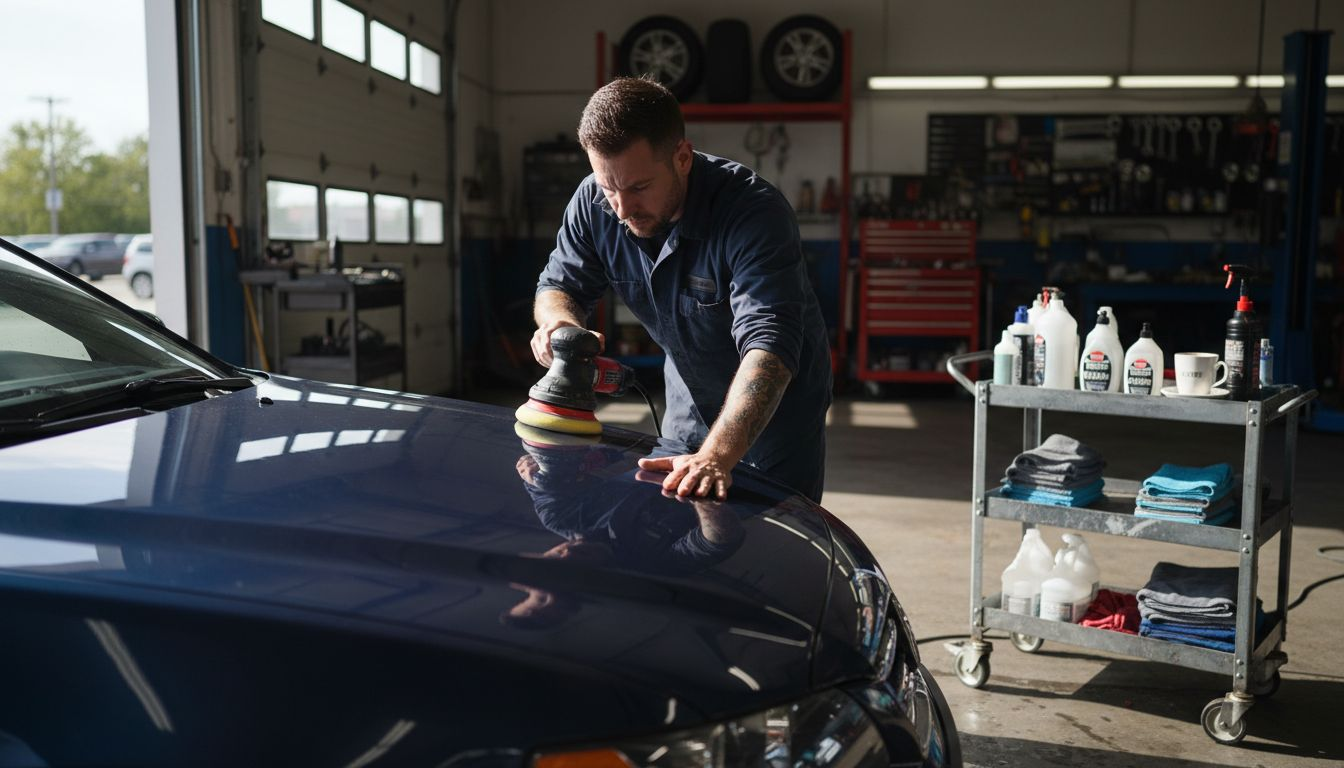
4. Work in Small Sections for Precision
Precision is the hallmark of professional paint correction. Breaking down your vehicle’s surface into manageable sections ensures thorough defect removal and prevents uneven correction results.
Recommended Section Sizes:
Hood: 2 foot by 2 foot grid sections
Doors: Individual panel sections
Roof: 18 inch square work areas
Fenders: Smaller 12 inch segments
Professional detailers understand that systematic surface segmentation maximizes correction effectiveness. By working in small controlled areas you can:
Benefits of Sectional Approach:
Maintain consistent pressure
Monitor correction progress
Prevent compound drying
Ensure uniform paint refinement
Minimize potential damage from overworking
Use painter tape to outline your work sections if needed. This creates clear boundaries and helps you track your progress systematically. Work methodically from one section to the next keeping your movements slow and controlled.
Remember that lighting plays a crucial role. Use bright natural or LED lighting that reveals surface imperfections clearly while you work through each section. This helps you identify subtle defects and track your correction progress accurately.
Pro tip: Keep a clean microfiber towel and inspection light nearby to frequently wipe and check your progress in each section.
5. Keep the Surface Cool and Well-Lit
Temperature and lighting are critical factors that can make or break your paint correction process. Understanding how environmental conditions impact paint treatment is essential for achieving professional results.
Temperature Impact on Paint Correction:
Ideal working temperature range: 55 to 75 degrees Fahrenheit
Avoid direct sunlight and hot surfaces
Choose indoor or shaded workspace when possible
Lighting Considerations:
Use multiple light sources
Employ LED or natural daylight
Position lights to reveal surface imperfections
Paint treatment environmental factors dramatically influence correction outcomes. High temperatures can cause polishing compounds to dry too quickly creating uneven results and potentially damaging the paint surface.
Lighting Techniques:
Use 5000K color temperature lights
Angle lights to create cross shadows
Move lights to reveal subtle paint defects
Utilize handheld inspection lights for detailed work
Professional detailers know that proper lighting helps identify imperfections invisible under standard conditions. Cooler surfaces allow polishing compounds to work more effectively reducing the risk of burning through the clear coat.
Pro tip: Invest in a portable LED light panel with adjustable color temperature to create optimal inspection conditions during paint correction.
6. Use Soft Microfiber Cloths for Removal
The secret weapon of professional detailers is a high quality microfiber cloth. These remarkable tools are far more than simple cleaning rags they are precision instruments designed to protect and perfect your vehicle’s finish.
Microfiber Cloth Characteristics:
Ultra fine fiber composition
Exceptional dirt and residue absorption
Lint free surface
Soft textured material
Chemical resistant properties
Microfiber cleaning technology provides unparalleled surface protection during paint correction. The microscopic fibers attract and trap polishing compound residues without scratching or marring the paint surface.
Proper Microfiber Cloth Selection:
Choose 300 to 400 GSM weight cloths
Select cloths with tight weave patterns
Use different cloths for different stages
Avoid cloths with hard edges or loose threads
Professional detailers recommend using separate microfiber cloths for each stage of paint correction. One cloth for initial compound removal another for final buffing ensures maximum clarity and shine.
Best Practices:
Fold cloth into quarters for multiple clean surfaces
Use light pressure during removal
Rotate cloth frequently to prevent buildup
Wash microfiber cloths separately from other laundry
Pro tip: Invest in multiple high quality microfiber towels and color code them for different correction stages to maintain organization and prevent cross contamination.
7. Seal and Protect the Corrected Paint
After investing time and effort into paint correction, sealing the surface becomes your ultimate defense against environmental damage. The final protective layer transforms your meticulous work into a lasting shine that resists wear and degradation.
Protection Options:
Ceramic coatings
Paint protection film
Traditional carnauba wax
Synthetic sealants
Hybrid protection systems
Protective paint systems play a critical role in maintaining your vehicle’s aesthetic and structural integrity. Each protection method offers unique benefits depending on your specific needs and environmental conditions.
Key Considerations for Sealant Selection:
UV resistance level
Expected durability
Environmental exposure
Vehicle usage frequency
Budget constraints
Ceramic coatings provide exceptional long term protection typically lasting 2 to 5 years. They create a molecular bonded layer that shields against contaminants ultraviolet rays and minor scratches. Paint protection film offers physical barrier protection against rock chips and road debris.
Professional detailers recommend applying protection within 24 to 48 hours after completing paint correction to maximize adhesion and effectiveness.
Pro tip: Always ensure your surface is completely clean and free of residues before applying any protective coating to guarantee optimal bonding and performance.
Below is a comprehensive table summarizing the critical steps and considerations for performing effective vehicle paint correction as detailed in the article.
Step | Actions and Details | Purpose and Benefits |
Assess Paint Condition | Inspect visually and tactilely under natural light; categorize damage types and levels. | Guides methodical correction strategy and prevents overcorrection damage. |
Perform Decontamination Wash | Use chemical and physical techniques to remove surface contaminants before polishing. | Creates an uncontaminated base to enhance polishing effectiveness. |
Select Correct Compound and Pad | Match compound abrasiveness and pad type with paint hardness and defect severity. | Ensures precise correction without unnecessary paint removal. |
Work in Small Precise Sections | Divide the surface into manageable grids, applying consistent pressure and technique. | Promotes uniform results and targeted defect correction. |
Maintain Cool and Well-Lit Conditions | Ensure appropriate temperature and lighting during work for optimal outcomes. | Prevents compound drying and highlights surface imperfections. |
Use Microfiber Cloths for Removal | Employ high-quality microfiber cloths for gentle and effective residue removal. | Protects the paint and maintains smooth finish. |
Seal Corrected Surface | Apply a suitable protective layer promptly after correction. | Safeguards against environmental damage and enhances longevity of results. |
Achieve Flawless Paint Correction and Lasting Protection with Optyx Auto Studio
The article highlights the challenges of achieving perfect paint correction while protecting your vehicle’s finish from damage and environmental factors. If you want to avoid risks like improper compound choice, surface overheating, or missed contaminants that degrade your car’s shine, it is essential to trust experts who specialize in precise and detail-oriented paint correction techniques. With Optyx Auto Studio’s advanced solutions like premium paint correction services, ceramic coatings, and paint protection film, you gain professional care that ensures a durable flawless finish and superior protection against daily wear.

Don’t settle for temporary fixes or guesswork on your vehicle’s paint. Invest in high-quality automotive restyling and protection from our certified installers who use top-tier products and precise application methods to keep your vehicle looking stunning for years. Start your journey toward a lasting shine with Optyx Auto Studio today. Explore our expert services and schedule your consultation now at Optyx Auto Studio. Discover how our paint correction and ceramic coating solutions can transform your vehicle’s appearance and protect its value.
Frequently Asked Questions
How do I assess the paint condition of my vehicle before starting paint correction?
Start by performing a visual and tactile inspection of your vehicle’s paint under natural light. Look for imperfections such as swirl marks, scratches, oxidation, and roughness, and classify the paint condition to properly prepare for correction methods.
What is the decontamination wash process necessary before paint correction?
A decontamination wash involves more than just soap and water; use an iron removal solution, a clay bar, and a dedicated surface cleaner to remove stubborn contaminants. Complete this process thoroughly to ensure a clean surface free from residues prior to polishing.
How do I choose the right polishing compound and pad for paint correction?
Select compounds and pads based on the hardness of the paint and the depth of the imperfections. Start with the least aggressive combination, like a soft pad paired with a less cutting compound, then increase aggressiveness if necessary to avoid damaging the paint.
Why is it important to work in small sections during paint correction?
Working in small sections allows for greater control and precision, ensuring even defect removal and preventing uneven results. Aim to tackle manageable areas, like 2-foot by 2-foot sections on the hood, to monitor progress effectively and maintain consistent pressure.
What environmental conditions should I consider while performing paint correction?
Ensure you work in a cool environment with temperatures between 55 to 75 degrees Fahrenheit to prevent compounds from drying too quickly. Use multiple light sources to reveal surface imperfections clearly, making it easier to achieve a flawless finish.
What should I use to remove polishing compounds effectively?
Use high-quality microfiber cloths for removal, as their fine fibers trap residues without scratching the paint. Fold the cloth into quarters for multiple clean surfaces, and rotate it frequently to prevent buildup during the correction process.
Recommended


Comments